Sales & Purchases Guide
Manage your everyday business transactions easily. This guide explains how you record money coming in (Sales) and money going out (Purchases), and how we automatically handle the tricky tax math for you.
How the Sales Module Works
The Sales page is where you record everything you sell to your customers. When you enter a sale, the system doesn't just save it; it automatically figures out how much tax you owe the government and updates your business records instantly.
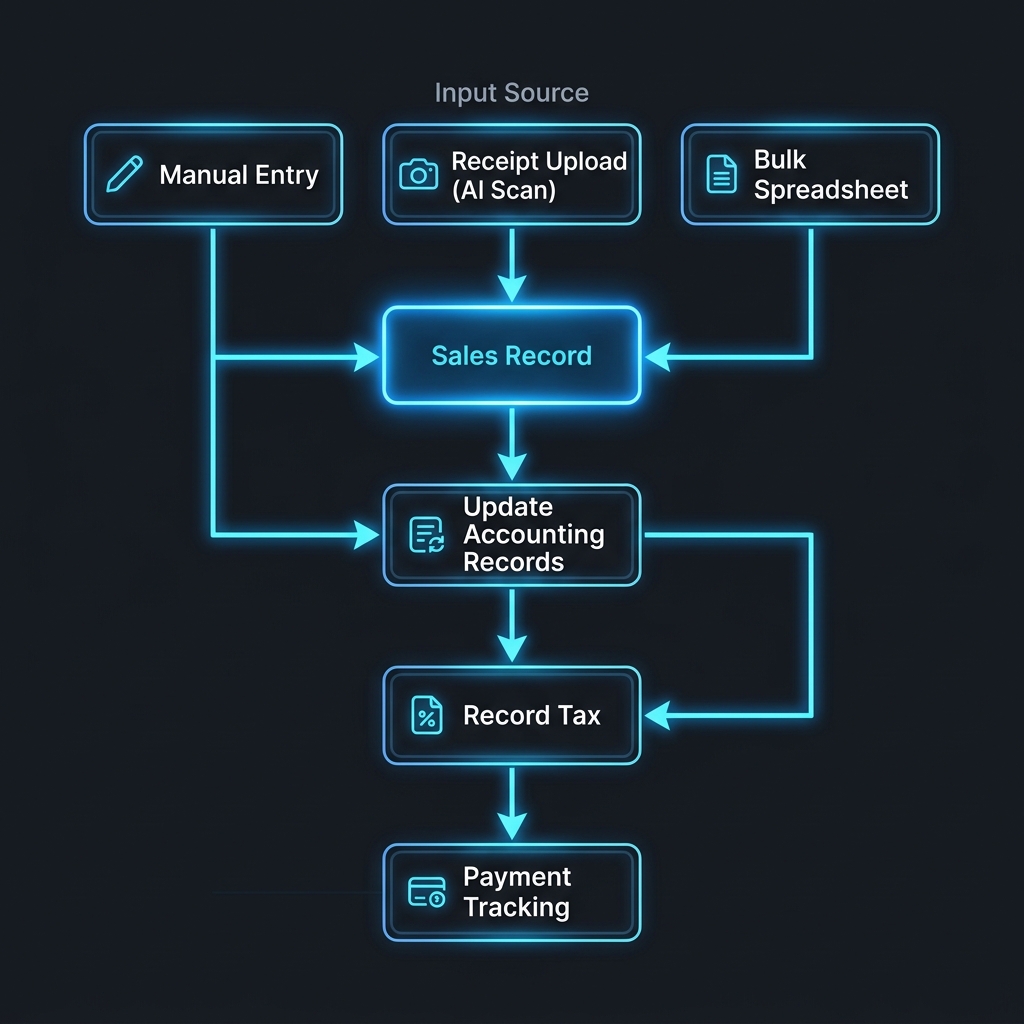
Visualizing the automated sales process: Entry → Update Accounting Records → Record Tax → Payment Tracking.
1. The Information We Track
When you enter a sale, we securely save a few important details to make sure you are always ready for a tax audit:
- Who bought it: You can save the Customer's Name and their Tax ID (TIN). This helps track who owes you money.
- The Receipt Number: The number printed on the receipt from your physical cash register machine (the FS Number).
- The Money Breakdown: We clearly split the total amount into the "actual price of the item" and the "tax amount collected".
- Tax Category: We let you mark if a sale includes VAT, is tax-free (Exempt), or was sold to another country (Export). This tells the system exactly where to put it on your monthly tax return.
2. Automatic Bookkeeping
You don't need to be an accountant to use Gibir-Negari. When you save a sale, we automatically write it in your accounting books in the background.
For example, if you sell something for 1,150 Birr (which includes 150 Birr in tax):
- We record that a customer owes you 1,150 Birr.
- We record that your business earned 1,000 Birr in revenue.
- We record that you owe the government 150 Birr in tax.
If you ever delete a mistake, we safely undo the math so your books are never messed up.
3. When Big Companies Hold Back Your Tax (VAT Withholding)
In Ethiopia, some large companies and government offices are required to keep half of the VAT they owe you and pay it directly to the tax office themselves. Here is how we handle it:
- You enter the sale normally, exactly as it appears on your cash register.
- If you sold to a large organization that keeps half the VAT, you tell the system how much they kept and their Tax ID (TIN).
- Our system is smart enough to reduce the amount the customer owes you, and instead records that the government owes you credit for that tax.
- We automatically fill out the special form required on the government's tax website at the end of the month.
4. Tracking Who Paid You
When you first make a sale, the system assumes the customer hasn't paid yet (unless it's a cash sale).
- You can easily log when a customer pays you, even if they only pay half now and half later.
- You can record if they paid in Cash or into your Bank Account.
- Once they pay the full amount, the system automatically marks the invoice as "Paid" and stops reminding you about it.

The Sales interface where you record new invoices and manage unpaid bills.
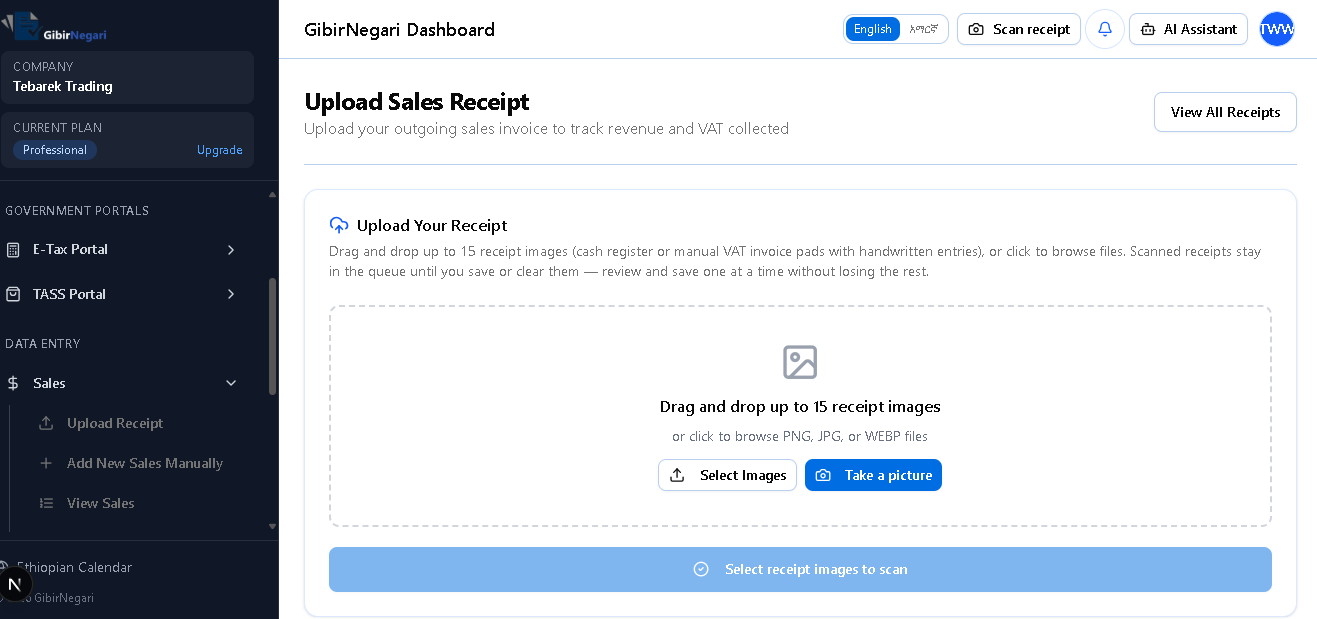
The Sales Upload interface for bulk processing multiple invoices at once.
5. Step-by-Step Operations
Here are the common operations you will perform within the Sales module, along with the steps and navigation links to get started.
ACreate a Single Sale Manually (Sales Entry)
The Sales Entry form handles complex tax mathematics automatically based on your business type (VAT or TOT). Follow these steps to record a sale:
- Start the Entry: Navigate to the Sales Record Page. Choose "Manual Entry".
- Basic Details:
- Select the Sale Date using either the Ethiopian or Gregorian calendar picker.
- Enter the Customer Name and their 10-digit TIN (optional, but recommended).
- Enter the Receipt Number (FS Number) exactly as printed on your cash register machine.
- Choose the Tax Method:
- If your business uses VAT: Select the VAT Classification.
- Taxable (15%): Standard rate.
- Zero-Rated (0%): E.g., for exports.
- Exempt (0%): For non-taxable goods/services. - If your business uses TOT (Turnover Tax): The tax rate is selected per-item in the next step (either 2% for goods or 10% for services).
- If your business uses VAT: Select the VAT Classification.
- Add Line Items: For each item sold, click "Add Item" and enter:
- Description, Quantity, and Unit Price.
- Automatic Math: The system instantly calculates the Total Value, Tax Amount, and Gross Value based on your selected Tax Method.
- Income Withholding Tax (3%): If the transaction is subject to the standard 3% income withholding tax, you can select the 3% rate here to automatically deduct it from the payable amount.
- VAT Withholding (7.5%): If you sold to a large enterprise or government agency that is legally required to withhold half of the 15% VAT:
- Toggle "Enable VAT Withholding" at the bottom of the form.
- Enter the Withholding Agent's TIN and the special Withholding Receipt Number they provided.
- The system automatically calculates the 7.5% VAT withheld amount and records it as a tax credit owed to you by the government.
- Save: Click "Save" (or "Save & Post to Accounting" to instantly update your General Ledger).
BRecord a Customer Payment
- Go to Unpaid Sales or the main Sales Dashboard.
- Find the specific invoice the customer is paying for and click "Record Payment".
- Enter the payment amount and select the payment method (e.g., Cash, Bank).
- Click "Save Payment". The invoice will be marked as "Paid" once fully settled.
CUpload Sales in Bulk (Spreadsheet)
- Go to the Bulk Import section.
- Download the provided Excel template.
- Fill the spreadsheet with your daily or monthly sales data.
- Upload the file back into the system. It will validate the data and save all sales at once.
DScan a Sales Receipt (AI Capture)
- Navigate to the Camera Capture (Sales) page.
- Use your phone or webcam to take a clear photo of an outgoing sales invoice. Processing starts automatically.
- Wait a few seconds for the AI to extract the Customer TIN, Receipt Number, Date, and Tax Amounts.
- Review the extracted information for accuracy in the Upload Queue and click "Confirm & Save".
How the Purchases Module Works
The Purchases page is where you record everything you buy for your business. By tracking this carefully, you legally reduce the amount of tax you have to pay the government at the end of the year, and you can claim back the VAT you spent.
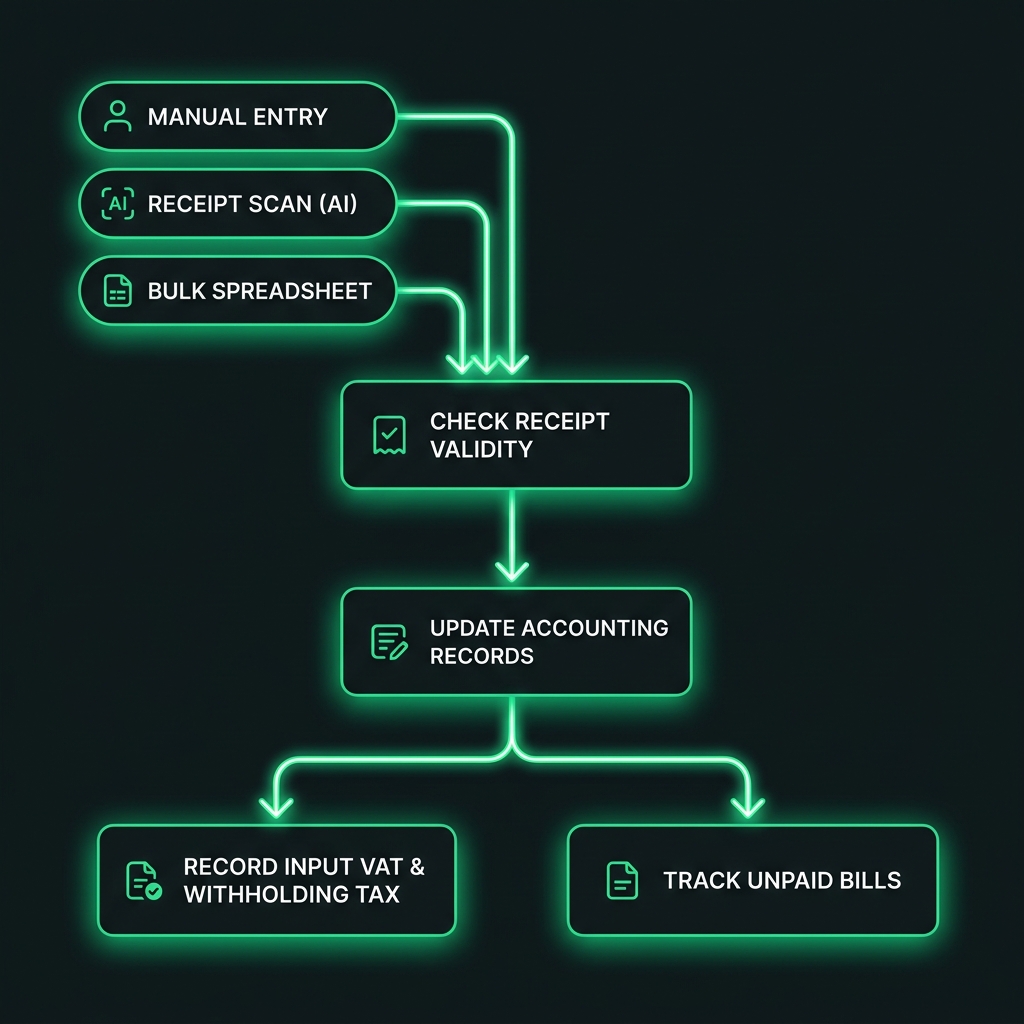
Visualizing the automated purchases process: Entry → Check Validity → Update Accounting → Record Tax & Track Bills.
1. The Information We Track
When you enter a purchase from a supplier, we save these important details so your tax claims are never rejected:
- Who you bought from: The Supplier's Name and Tax ID (TIN). This proves you bought from a registered business.
- The Receipt Number: The exact FS Number printed on the receipt they gave you.
- Claiming Back Tax (Input VAT): If the item included VAT, we split that out. The government allows you to subtract this VAT from what you owe them later.
- Expense Category: You categorize what you bought (like "Office Supplies", "Rent", or "Inventory"). This builds your profit and loss report automatically.
2. Automatic Bookkeeping for Expenses
Just like with sales, entering a purchase automatically updates your accounting books to show your new expenses and tax credits.
For example, if you buy office supplies for 1,150 Birr (which includes 150 Birr VAT):
- We record that your business has a new Expense of 1,000 Birr (which lowers your yearly profit tax).
- We record that the government owes you 150 Birr in VAT credit.
- We record that you owe the supplier 1,150 Birr.
3. Automatic Reminders for the 3% Withholding Tax
Ethiopian law requires that if you buy goods worth more than 10,000 Birr (or services over 3,000 Birr), you cannot pay the supplier the full amount. You must hold back 3% and pay it to the tax office for them.
- Our system constantly watches how much you spend on every receipt.
- If your purchase goes over the legal limit, the system instantly pops up a warning reminding you to hold back the 3%.
- It automatically calculates the exact 3% amount.
- It prepares the special "Withholding Receipt" that you need to print and give to the supplier as proof.
- It adds this 3% to a list of money you need to send to the tax office at the end of the month.
4. Tracking Who You Owe (Unpaid Bills)
When you enter a purchase, the system puts it on your "Unpaid Bills" list (Accounts Payable).
- You can log partial or full payments when you actually pay the supplier.
- You can record if you paid them from your Cash register or via a Bank Transfer.
- Once you log the payment, the bill is marked "Paid" and removed from your outstanding debts list.
5. Buying Big Things (Assets vs. Expenses)
The system treats small everyday purchases differently from large, long-lasting items.
- Regular Expenses: Things like paper, electricity, or minor repairs. These reduce your profit immediately in the current month.
- Fixed Assets: Things like computers, cars, or furniture. If you categorize a purchase as an Asset, the system knows not to deduct the whole cost today. Instead, it places it in your "Asset List" so you can slowly deduct its value over several years (Depreciation).
6. Checking if Receipts are Real
You can only claim a tax discount on purchases if the person who sold it to you actually reported the sale to the government. If they gave you a fake receipt, you get in trouble during an audit.
Gibir-Negari uses a smart automatic tool to quietly log into the government's website. We verify that the receipt number you typed in is real and officially reported by the seller, keeping you completely safe from penalties.
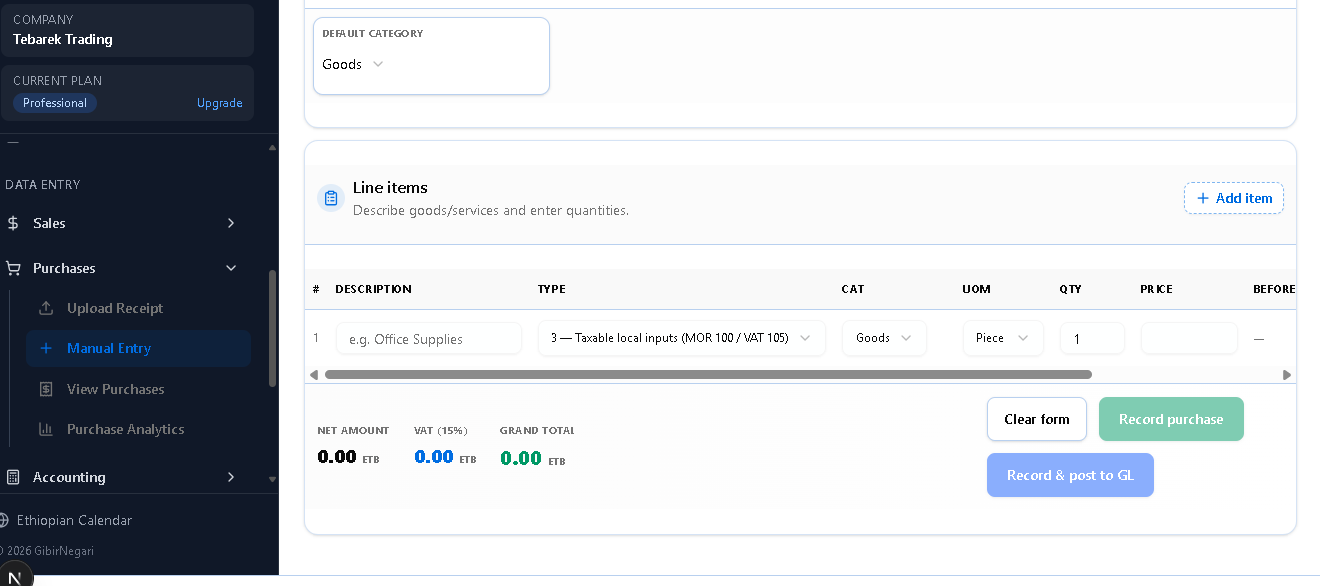
The Purchases interface where you record vendor bills and track expenses.
The Purchases Upload interface for bulk importing multiple vendor invoices.
7. Step-by-Step Operations
Here are the common operations you will perform within the Purchases module, along with the steps and navigation links.
AEnter a Single Purchase Manually
- Start the Entry: Navigate to the Manual Purchase Entry Page.
- Basic Details:
- Select the Purchase Date using either the Ethiopian or Gregorian calendar picker.
- Enter the Supplier Name and their 10-digit TIN.
- Enter the Receipt Number and MRC Number (if provided from a cash register).
- Add Line Items: For each item bought, click "Add Item" and enter:
- Purchase Type: Select the e-Tax purchase type (1-8). Note: Types 6 and 7 are completely free of VAT, while others generally include a 15% VAT on the base.
- Unit of Measure & Category: Select how the item is measured (e.g., KG, Piece, Litre) and the VAT category (Goods or Services).
- Amounts: Enter the Quantity and Unit Price.
- Automatic Math: The system instantly calculates the VAT Paid and Gross Value based on the purchase type and vendor tax type (VAT/TOT).
- Income Withholding Tax (3% or 30%): If your purchase goes over the legal limit, the system alerts you to hold back the withholding tax.
- You can enable the Auto-WHT setting to compute it automatically, or manually apply the 3% rate.
- The system records the withheld amount. When saving, you will be prompted to enter the Withholding Receipt Number you gave the supplier.
- Save: Click "Save" (or "Save & Post to Accounting" to instantly update your General Ledger).
BRecord a Payment to Supplier
- Navigate to the Purchases List.
- Find the specific unpaid bill and click "Record Payment".
- Enter the payment amount and select the payment method (e.g., Cash, Bank Transfer).
- Click "Save Payment". The bill will be marked as "Paid" and removed from your outstanding debts list.
CUpload Purchases in Bulk (Spreadsheet)
- On the Purchase Entry Page, switch to the "Bulk Upload (CSV)" tab.
- Download the provided Excel template.
- Fill the spreadsheet with your purchase records (Seller Name, TIN, Purchase Type, etc.).
- Upload the file back into the system. It will auto-detect the vendor types, validate the data, and save all records instantly.
DView Procurement Insights
- Navigate to the Procurement Insights Dashboard.
- Select the Fiscal Year (Ethiopian or Gregorian).
- View interactive charts detailing your gross expenditure, VAT paid, recent trends, and strategic supplier analytics.
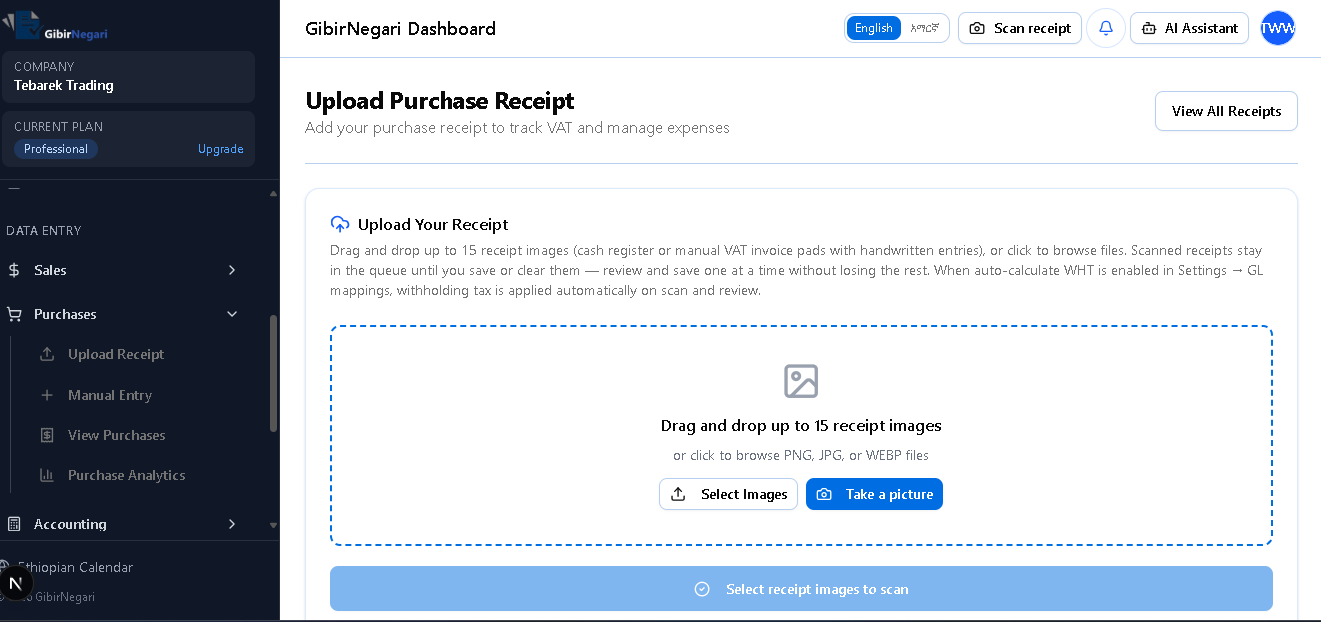
EScan a Purchase Receipt (AI Capture)
- Navigate to the Camera Capture (Purchases) page.
- Use your phone or webcam to take a clear photo of a vendor invoice or purchase receipt. Processing starts automatically.
- Wait a few seconds for the AI to extract the Supplier TIN, Receipt Number, Date, and Tax Amounts.
- Review the extracted information for accuracy in the Upload Queue and click "Confirm & Save".
Easy Ways to Enter Your Data
Take a Photo (AI Scanner)
Instead of typing everything by hand, you can just take a picture of your physical receipt. Our smart AI robot will read the picture and automatically fill out the boxes for you, including:
- The seller's Tax ID (TIN)
- The receipt number and date
- The total price and the tax amount
Note: Your plan decides how many photos you can scan per month.
Upload a Spreadsheet
If your business has hundreds of sales a day (like a supermarket or an online store), typing them one by one takes too long.
- Download our simple Excel template.
- Paste all your sales into the spreadsheet at once.
- Upload it back to us. The system checks the whole list for mistakes instantly and saves them all in one click.